Figure 12.3:
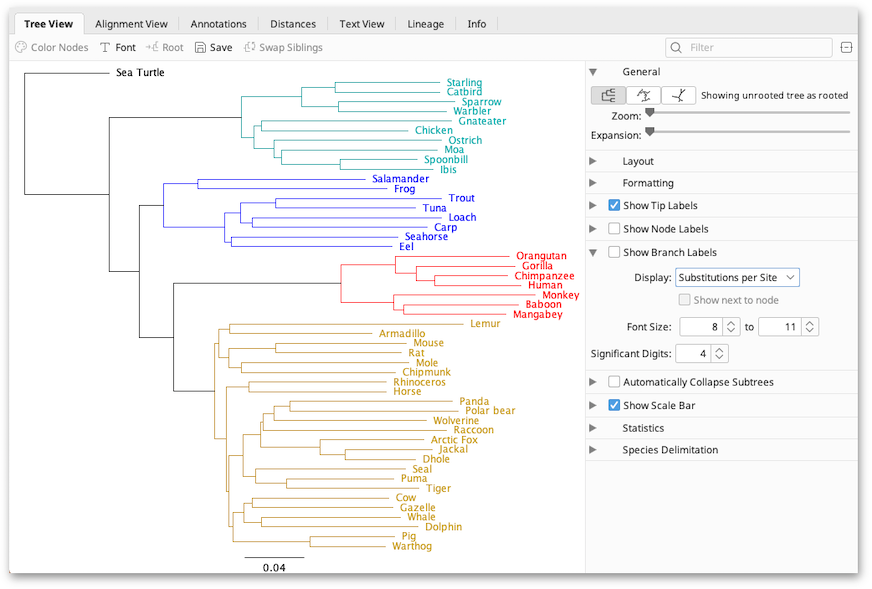
A view of a phylogenetic tree in Geneious Prime
Once the tree is built it will appear in the Document Viewer window (Figure 12.3 ). When viewing a tree a number of other view tabs may be available depending on the information at hand. The Alignment View tab will be visible if the tree was built from a sequence alignment using Geneious. The Text View shows the tree in text format (Newick).
The tabs to the right of the tree viewer contain options for controlling the look of the tree, and the information displayed on it. The toolbar above the tree provides additional formatting options, and allows you to change the root, or rearrange the tree. The subsequent sections provide more detail on these options.
If you are viewing a tree set, this option will be displayed. Select the tree you want to view from the list.
The General tab has 3 buttons showing the different possible tree views: rooted, circular, and unrooted. The Zoom slider controls the zoom level of the tree while the Expansion slider expands the tree vertically (in the rooted layout).
This has different options depending on the layout that you select above:
The following options are available for formatting branches:
If you are unfamiliar with tree structures, please refer to Figure 12.1 for a diagram of tips, nodes and labels.
Show tip labels: This refers to labels on the tips of the branches of the tree. Tip labels can be any of the fields on your document, and can be set in the Display option. To select multiple fields to display at the tips, hold down the command/control key while selecting.
Show node labels: This refers to labels on the internal nodes of the tree. If you are viewing a consensus tree, you can display consensus support % here, or you can display the node heights.
Show branch labels: This refers to labels the branches of the tree. You can display substitutions per site (branch lengths) here, or for a consensus or bootstrapped tree you can display consensus support % or bootstrap support %. Checking “show next to node” will move the labels from the middle of the branch to adjacent to the node.
For node and branch labels, the font can be set using the Font Size options in the tab. The tree viewer will shrink the font size of some labels if they cannot all fit in the available space. The lower end of the range specifies the minimum size that the tree viewer is allowed to shrink the label font to. The font sizes for the tip labels are set using the Font button in the toolbar above the tree viewer. Significant Digits sets how many digits to display if the value the node is displaying is numeric.
This option enables groups of similar nodes to be collapsed into a single node that represents that subtree. The maximum distance within the subtrees is determined by the Subtree Distance slider. Use this option to help navigate trees with many nodes and tips.
Collapsed nodes are labelled with the name of one of the tips, a count of how many tips the subtree contains, and the maximum distance between the top of the subtree and any of the tips within it. Double-clicking a node in a tree will force it to expand or contract. Automatically Collapse Subtrees will not override this state. To reset the state of double-clicked nodes in the tree, click Reset state of X nodes. X is the number of nodes with a manually expanded or collapsed state.
This displays a scale bar at the bottom of the tree view to indicate the length of the branches of the tree. It has three options: Scale range, font size and line weight. Setting the scale range to 0.0 allows the scale bar to choose its own length, otherwise it will be the length that you specify.
Displays information on the number of nodes and number of tips in the tree.
The buttons on the toolbar along the top of the viewer allow you to edit the tree.
Click on a node in the tree viewer to select the node and its clade. Double-click the node to collapse/un-collapse the clade in the view. Once you have selected a clade in the view, you can edit it using the following toolbar buttons:
In version 9 onwards, the toolbar also contains a Search box that allows you to search for particular tip labels. If a match is found, this tip is displayed on the tree and all other tips are greyed out. If you wish to search by a field that is not currently displayed on a tip label, you need to change the field under Show Tip Labels first.