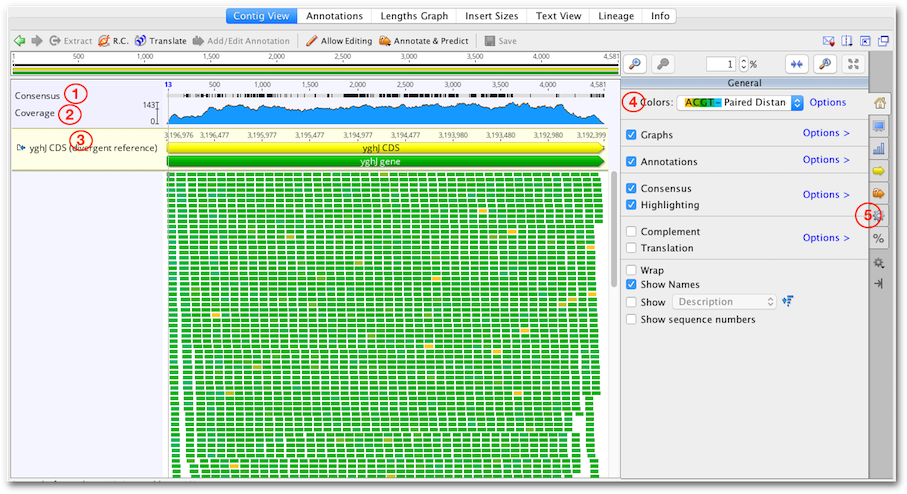
Figure 10.6:
The Contig Viewer
Contigs in Geneious Prime are viewed and edited in exactly the same way as alignments (see section 9.3 ). Features particularly relevant to contig assemblies are highlighted on Figure 10.6 and described below.
The consensus sequence is displayed at the top of the assembly. This is the consensus of the reads only and does not include the reference sequence if one is present. The consensus settings can be found under the  Display tab, and information about these settings can be found in section 9.5
. If the sequences in the contig have quality information attached we recommend selecting the Highest Quality consensus type. In most cases this removes the need for manually editing the contig because the consensus will be the base with the highest total quality at each position.
Display tab, and information about these settings can be found in section 9.5
. If the sequences in the contig have quality information attached we recommend selecting the Highest Quality consensus type. In most cases this removes the need for manually editing the contig because the consensus will be the base with the highest total quality at each position.
The coverage graph shows how many reads map at each position and can be useful for assessing the quality of your mapping. The  Graphs tab enables you to show or hide the Coverage graph as well as enable other graphs such as the Identity or Sequence Logo graphs. See section 9.3.2
for a detailed description of these graphs. The data underlying these graphs can be exported in CSV format by clicking the Export option under the Graphs tab.
Graphs tab enables you to show or hide the Coverage graph as well as enable other graphs such as the Identity or Sequence Logo graphs. See section 9.3.2
for a detailed description of these graphs. The data underlying these graphs can be exported in CSV format by clicking the Export option under the Graphs tab.
If you have run Map to Reference, the reference sequence is shown at the top of the assembly and is shaded yellow.
The coloring of bases in the assembly can be selected from the dropdown Colors menu at the top of the  General tab. Color schemes particularly useful for contig assemblies include the following:
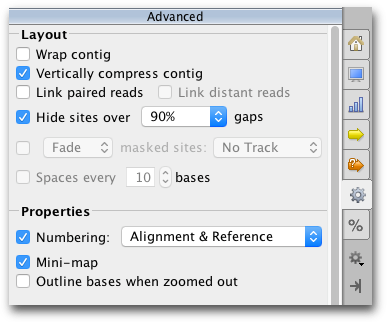
The settings under the  Advanced tab contain options for adjusting the layout of the contig.
Assemblies of short read data are normally viewed with the option Vertically compress contig enabled. This option puts the reads side by side where possible so that multiple reads can be viewed in the same row. Vertically compress contig cannot be enabled if Wrap contig is switched on. Wrap Contig will wrap the assembly to the screen width and is not recommended for large assemblies.
Hide sites over x % gaps hides sites that have over the set percentage of gaps, so that indels introduced by sequencing errors do not interfere with the viewing of the alignment. This setting does not hide sites where the reference is a non-gap, and does not hide scaffolding gaps in de novo contigs. This setting can only be enabled when wrap contigs is switched off, and editing mode is switched off.
Link Paired Reads: With this option on, pairs of reads will be laid out in the same row with a horizontal line connecting them. This option is only visible on contigs containing reads that have been paired before assembling - see section 10.2.1 . Reads separated by more than 3 times their expected distance are not linked by default unless the Link distant reads setting is turned on.
The horizontal line between paired reads is colored according to how close the separation between the reads is to their expected separation. The coloring is the same as for Paired Distance coloring described above, where Green indicates they are correct, yellow and blue indicate under or over their expected separation and red indicates the reads are incorrectly orientated.
If Link Paired Reads is off, it is still possible to view the connecting line between any pair of reads by mousing over one of the reads. To find the pair of a particular read, right click on the read and choose Go to paired mate.
In addition to the coverage graph which gives you a quick overview of coverage, under the Annotate & Predict toolbar is the Find Low/High Coverage feature. This feature annotates all regions of low/high coverage which you can then navigate through using the little left and right arrows next to the coverage annotations in the controls on the right. You can set the threshold low/high coverage by either specifying an absolute number of sequences or a number of standard deviations from the mean coverage.
The find low/high coverage tool can also be used to record the minimum, mean, and maximum coverage of each annotation of a particular type on the reference sequence. To do this, in the Only Find In section of the options, turn on Annotations in reference sequence of type and choose Create annotations of same type on reference sequence.